 I’m going to preface this post by saying that I am just about the last person in the world to be passing out Photoshop and food photography tips. That may be the case, but I am going to do it anyway! My dear friend, Julie Lackey, who is an extremely talented portrait photographer, shared this tip with me awhile back and I have used it more than I ever thought I would.
One of the things I hate about the winter months in the midwest is how dark it gets so early in the evening. This frustrated me as a kid because it always meant we had to come in earlier from playing. Now, as an adult and one of those crazy people who can always be found taking photos of the food she cooks, the early sunset means that it is that much harder to get a good photo of dinner in the natural light. Around this time of year, a lot of food bloggers will be posting baked goods and desserts simply because it is too difficult to take a good photo at dinner time.
Enter my friend Julie and her Photoshop tip. This tip works if you take a photo and notice that the image is too dark, which usually happens when your flash is off and there isn’t enough natural light pouring in. I am not a techie, so please excuse my non-technical terms as I flubber through sharing this with you.
- Open your dark photo in Photoshop
- Up at the top toolbar go to the “Layers” tab and then drop down and select “Duplicate Layer”
- If your layers window isn’t open on the side of your PS main window, go up to the top toolbar, go to the “Windows” tab and select “Layers”
- OK – now that the layers window is open, you should see a drop down menu in it that shows “normal”. Click on that and go down to where it says “screen”. Your photo should brighten up immediatley. If it is too bright, adjust the opacity (located in your layers window) to a lower percent.
- Now, go back up to the Layers tab on the top of your Photoshop screen and drop down to “Flatten Image”
- If your photo still needs to be brighter, repeat steps 2 – 5.
- When I have the photo as I want it, I usually adjust the saturation slightly to give it a little pop of color and will also sometimes do a curve adjustment
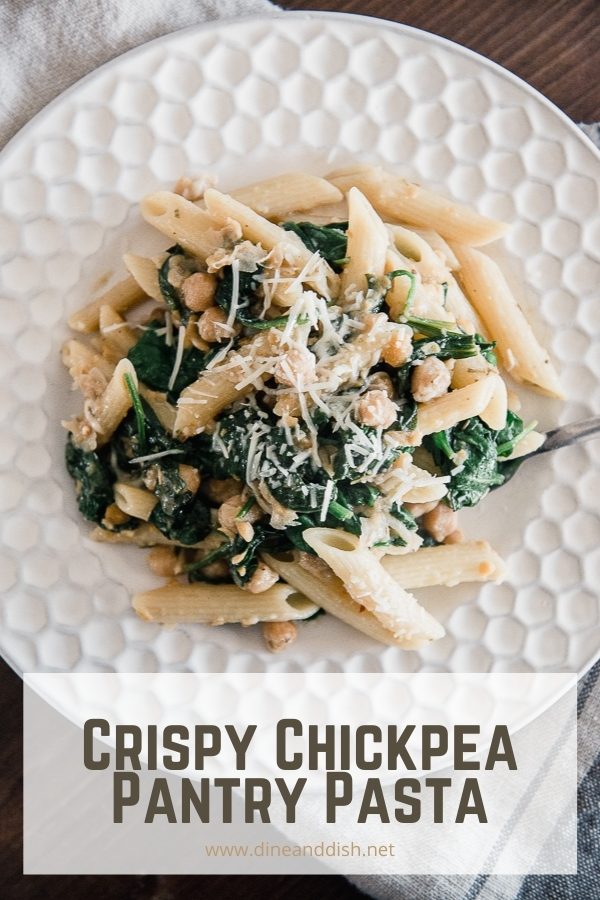
The photo below was a prior version of the one at the top of this post. To save this photo from ending up in my computer recycle bin, I made the changes listed above and was able to salvage it. Many of you probably know this tip, but for those of you who don’t, I hope you found it helpful! Thank you, Julie, for sharing this tip with me and for allowing me to showcase my dinner in a new light.
What is one of your favorite photo editing tips?
 And now for the recipe… a quick and easy one from Simple & Delicious magazine!
Thai Shrimp Linguine (from Simple and Delicious Magazine)
20 min | 5 min prep
SERVES 3
- 1 (9 ounce) package fresh linguine
- 1 cup fresh snow pea
- 2 cups shredded carrots
- 1/2 lb sliced fresh mushrooms
- 1 tablespoon olive oil
- 1/2 lb uncooked medium shrimp, peeled and deveined
- 1 cup Thai peanut sauce
- Cook linguine according to package directions, adding snow peas and linguine at the same time.
- Meanwhile, in a large skillet, cook carrots and mushrooms in oil over medium heat for 3 minutes. Add shrimp; cook and stir 3 minutes longer or until shrimp turns pink. Stir in peanut sauce; heat through.
- Drain linguine and snow peas; transfer to a serving bowl. Top with shirmp mixture; toss to coat.


I’m one that does not like to take pictures at this time of the year, except as you said, of baked goods. I don’t have Photoshop and wish I did. Thanks for the tips.
Hélènes last blog post..Tortilla Soup
I use Picnik online photo processing. When you upload photos to Picnik, which is free for a basic subscription that has tons of editing options, you can select the ‘Exposure’ tab to lighten and enhance your pictures. You can also sharpen photos that might be slightly fuzzy and enhance the color of them. None of my photos would look even halfway as good as they do without Picnik. And it’s free!! Go to http://www.picnik.com
Kates last blog post..Guys got game in the kitchen
Wow, that really worked! Thanks for the tip. I now shoot my photos in RAW, which allows me to fiddle with the various settings. I found a lot of great tips from this post on No Recipes: http://www.norecipes.com/2009/01/10/adobe-lightroom-tutorial-aka-my-dirty-little-secret/comment-page-1/#comment-3654
PaniniKathys last blog post..Bacon, Cheddar & Grilled Tomato Panini
we have the opposite problem in Australia at the moment. being summer and daylight savings my kids refuse to go to bed before it’s dark and that is almost 9pm at the moment!
btw- your thai prawns look amazing!
MsGourmets last blog post..Mid-week Find – Lindsay Pemberton
No way…that photo up top looks light it was shot in front of a sunny window! I don’t have Photoshop, so I just use either Picasa or Picnik to edit my images.
Tanyas last blog post..Gooey Butter Cake
I don’t have photoshop so I just hope there are leftovers to take a picture of the next day when there’s some natural light (albeit not much these days with the low cloudy skies)!
Hopies last blog post..Obama Family Chili
Oh, I can always use photoshop tips, thanks! I didn’t realize the trick was to switch to baked goods.. I’ve just pushed through with badly lit photos. Wish I had some to offer you….
Julias last blog post..Craving Summer, Part I – Tater Tots
I’m another one who doesn’t have photoshop… one day I’ll get it! I just have a white box made of foam board and two lights attached… that’s were most of my photos are done. Thank goodness for that, or my blog would have NO pictures at all! 😉
patsyks last blog post..2008 Food Blog Awards – Voting is Now Open!
Thanks for the great photo tip! I have the same problem with taking pictures too late in the day. I tried your tip on Photoshop Elements and it worked beautifully!
Your dish looks delicious and your photo looks great.
Thanks so much for that tip! I get so frustrated with the lack of light these days, I haven’t been posting as much as I would have liked. I’m definitely trying that right away. And the Shrimp Linguine too, boy, does that ever look good. 🙂
LyBs last blog post..TWD – Orange Surprise Cake
I am thinking of buying a photo shop software too, but don’t know it’s worth all that money. Picasa and Flickr lets you do most of the improvement to photos, which I use. Let’s see! :))
Ashas last blog post..Deep pan Pizza Pie with Spinach-Feta filling and a dessert Pizza
I’ve never done that to brighten up my pics. I always use the curve tool or the levels screen for that. Great tip, I will sure to try it out 😀
Bens last blog post..Pork enchiladas with creamy poblano sauce
Great Photoshop tip! I’ve been shooting more in RAW, which requires lots of editing, and trying to cook more in the morning, too.
Lydia (The Perfect Pantry)s last blog post..Other People’s Pantries #51
The shrimp linguini looks delish — I’m loving all the veggies! And thanks for that tip. It’s definitely much easier than what I go through with Photoshop to lighten up dark shots! Can’t wait to try it out.
kellypeas last blog post..Jambalaya with Andouille Shrimp and Chicken
Hi Kristen!
Thanks for the interesting tips! I think that before try to use a image software editor is important to shot with good lighting (natural whenever is possible and in right angles) I’m not the best in capturing..must improve my shots but I manage pretty well this type of software for other uses, especially in graphic design!
By the way sublime shrimp recipe 🙂
Gera @ SweetsFoodss last blog post..Poll: How Important is Your Sweet Tooth?
Yay, a secret tip that is going to help me SO much.
Thanks for the recipe (I love anything with peanut sauce!), thanks for the photoshop tip (I’m terrible at futzing around on my own as a techie and learning these things), and I voted for jessica (good luck!).
Wow, what a change between the two photos. This is just what I needed to know over here in dark, dismal Scotland. I always find taking photos a real problem in the winter and tend to try and fit as much in as I can at the weekend. Thank you 🙂
hollers last blog post..Curly Kale, Watercress & Potato Soup with Peas
Incredible recipe, very healthy and easy to cook. I love thai food although some dishes can be a bit … spicy!
Learn English Onlines last blog post..English Grammar Secrets
More photoshop tips 🙂
Instead of dragging through menus to duplicate the layers, just hit CTRL-J
Such an easy and delicious looking dish. I’ll be trying this one for sure. Thanks!
I wish I had Photo Shop as my pics are too dark, but I’m also just learning to photograph food, so I’ve a long way to go.
Lyndas last blog post..Buttermilk Biscuits
Thanks for a great tip and your shrimp look delicious 🙂
Karens last blog post..Inaguration Day Burgers
What a great tip!! I usually just use the automatic features and add a warm filter. here in Australia at the moment I’m struggling with the bright light and too many shadows.
Natalies last blog post..Jewelry Box
Thanks for the photog tip. We have neither fancy cameras nor Photoshop, so we have to make due for now. 🙂 One day we’ll have fancy food photos!
The Duo Dishess last blog post..There’s a First for Everything
I wish I had photoshop! Some day soon! Thank you for the tip. The early nights are the hardest thing about blogging in the winter!
Thank you also for mentioning the food blog awards. We’ll see what happens!
Jessicas last blog post..Well Fed’s Food Blog Awards
Thanks for the photo tips! Much appreciated.
bensbaby116s last blog post..My 1st blog award…yay!
Thanks for the tip, I must try this out and it seems others above me are already impressed!
Peters last blog post..Kampanoules With Peppers and Basil (καμπανούλες με πιπεριές και βασιλικό)
This is a wonderful tip that I can’t wait to try out. I’m a graphic designer, and generally employ many of PhotoShops tools to edit my mealtime images when necessary — especially in the middle of Massachusetts winters — but have never used this tool. Thank you!
Erins last blog post..Mushroom Bourguignon
While living in Andorra we adopted a Spanish lifestyle – and never eat before 10:30 or 11… Which means I always take my photos after sunset… Thanks for the tip.
(I also just upgraded my photoshop – from 2 to 7)
Thanks for posting a great tip. I’m new to the whole thing, and the photography issues seem to be my biggest hurdle. Love your blog and all the great recipes you share.
Blessings!
Tammys last blog post..Iceberg Wedge with Blue Cheese
You don’t know how badly I needed this tip! I don’t know much at all about photoshop, but I’m sure this is going to save me. I’ve off to try it out!!
Deborahs last blog post..The Cake Slice Bakers – Banana Cake with Praline Filling and White Chocolate Ganache
I have never thought of using this method! It is cool! I usually adjust the brightness and contrast, but that doesn’t always work!
Thanks for sharing!
Mrs Ergüls last blog post..Peanut Cookies. The ONE.
oh, thanks for this tip! All my photos are dark this time of year, and I have actually been considering a photo lighting system to help alleviate the problem. I will see if this soles the problem first. Thanks!
Gudruns last blog post..Cookie Thursday: Brownies
WOW!!! What a great tip!!
marguerites last blog post..Monte Cristos
That is an amazing save! I don’t have PS or plan to buy it, though. I wonder if the same feat can be accomplished in Lightroom?
Nates last blog post..Foodbuzz 24, 24, 24: Chinese New Year Cioppino Hot Pot
Thanks for the tip. I’ve just been struggling with not doing any post photo work and having the photos be too dark!
Mrs. Ls last blog post..Small Plates – January 27, 2009
I usually use curves to edit my photos in photoshop but I use allll sorts of things depending on what the problem is. Nature of my biz…
Nicoles last blog post..Simple Yet Satisfying
Thanks for the great tips. My husband does my photography for my blog and he’s dying to get Photoshop. This seals the deal as far as I’m concerned.
Sam
My Carolina Kitchens last blog post..Heart Shaped French Creme Dessert with Red Berry Sauce is perfect for Valentine’s Day
thanks for the tips
foodbins last blog post..FISH SANDWICH
I was talking to a professional photographer and he gave me this tip:
Blur the duplicate layer, then click on Screen. It gives an interesting effect to the photo. You can adjust the ‘blur’ levels.
Lilianas last blog post..World Peace Cookies – Tuesdays with Dorie
Thanks for commenting on our blog! We’ve added you to the blogroll.
Rebekah at EADs last blog post..Crafts: Children’s Memory Game
Kristen
Thank you. I was just checking my blog and told I had a link to your page. So, I clicked on the link and read your post. Thank you.
Hope you’re doing well. Keep in touch.
Julie
This is quite possibly the most useful Photoshop tip I have come across since doing food photography. THANK YOU!
.-= Michelle {Brown Eyed Baker}´s last blog ..Fontina-Stuffed, Bacon-Wrapped Dates =-.
We are a group of volunteers and starting a new initiative in a community. Your blog supplied us important information to work on. You have done a marvellous work!